Gems of Advice Marion Machine Spotlight On: Secondary Crushing – Cone Crushers!

Written by Brandon Godman, Sales Engineer at Marion Machine
If you read my last couple of blogs, you may remember we left off talking about the conveyor belt.
If you haven’t had the chance to read them yet, I would ask that you take the time to do so and please don’t hesitate to give feedback. I am always open to suggestions / requested topics. Moving forward with this blog, will step forward to the next link in the chain of final product production – the cone crushers. Obviously, there are many other ways to obtain the final product beyond the cone crushers- impactors, mills, and roll crushers- but in my area of operation cone crushers are the most common. We may touch on the other items in later blogs / articles, but for now we are going to focus on the world of cones. Let’s put a few notches on, tighten those clamping cylinders, and get ready to let those dinosaurs eat!
Just like in previous blogs, I am going to reference the men that trained me personally in the operation of Symons cone crushers.
I learned on the “tried-and-true” Symons / Norberg 7’ Standard and Short head crushers. I was fortunate enough to learn a manual controlled system – no automation there… and as a matter of fact the man who trained me (a 20 plus year veteran – at that time) would often say that he was a firm believer that he could out crush any automated plant. I am fortunate to have kept in touch with some of the people working at his operation and heard that he may have a chance to prove that claim- they are looking at converting their plant over to automation. If anyone I knew could give the “machine” a run for its money I would say it would be him. I learned a lot from him, as well as the other guys at that operation. I feel truly blessed to have gotten to work with some truly awesome individuals in the industry- from my start as a night shift maintenance “spare hand” all the way up until I left the operation side of the business.
In order for you to understand, I need to share a little more about me personally that will become pertinent to this article.
I was transferred to the aforementioned plant in 2009 – right after a scary time of economic “turbulence” … so to say we were a little shorthanded would be putting it mildly. I was transferred to run the secondary plant and at that point I had no experience running any plant – and boy was I in for a shock! I came from an automated plant where the jaw house operator also ran the secondary by his computer… and it seemed that all he would have to do is look at it from time to time. I had very limited exposure to the plant control side of things. That jaw operator wasn’t a very “welcoming” kind of guy and anyone who has ever been to a rock quarry knows that a jaw house is usually very limited in square footage… the last thing I wanted to do was climb into that tin can asking him a bunch of questions. To say I had no clue what kind of job I had accepted when I agreed to transfer was putting it mildly. I did, however, luck out with the new group of guys I was to be working with. The foreman was a stern but fair senior employee with at least 25 -30 years of experience at that operation and like me he had grown up around the industry because his father had retired from that same operation. He was the type of leader that would take time to explain the how and why of things and not just tell you to “go do something”. This prelude about my personal experience helps set the scene for the rest of this article.
Cone crushers – the delicate dinosaurs… to some that may seem like an oxymoron- how could a dinosaur be delicate after all?
For starters, cone crushers are typically consistent in their operation – you put big rocks in and get little rocks out. That’s the very basic description of the process- but there is so much more than that to one cone crusher! From the old tried and true Symons / Nordberg 2’, 3’, 4’, 4 ¼’, 5 ½’ and even 7’ all they way up to the newer highspeed machines such as the Omnicone series, HP series, and even the GP series. I will primarily be speaking on the Old Symons / Norberg design line with mentions throughout of the newer designs.
Symons are relatively simple machines with a few critical focal points.
They seem to be forgiving machines up until the point when they’re not… and that’s when things get expensive quick. It takes a little time to dive into these machines, but once you understand what they need and what they are trying to tell you then you will know how to run them consistently and faithfully. It may sound like a broken record on a few of these topics if you have recently read my jaw crushers article, but that is because so much relies on routine. It really is as applicable to the cone crusher… if not more so due to the nature of the machine.
Pre-Daily Operation – please for the safety and operation of your facility – work to properly train new employees on how to do their work safely and correctly. Production truly starts with your people, and they are your most essential piece of the production puzzle. This article is based on my experiences here in Western North Carolina, and therefore some of this may not be relevant to your own plant. Feel free to skip ahead as needed.
- Everyone should have oil tank heaters – and they should be operational. Consistency is everything to these delicate dinosaurs – starting them every day with the smallest number of variables will only lengthen the life of these machines. Oil temps will vary – ambient air temps, humidity levels, and wind speed will all play a huge part in the oil temps, and the tank heaters can only do so much. The Metso manual states “Thermostatically controlled electric heaters are suggested to enable oil flow in cold weather. Heaters are recommended when lubricant temperatures in the oil tank drop below 16°C (60°F).” Where I am from, this applies to everyone.
- Check the oil level before starting the oil pump– this is to ensure there is enough oil present to prevent damage to the system before starting the pump. It is also a good practice to glance at the oil tank temp gauge at the same time to ensure the oil is above 60 degrees*.
- Scan the area for oil leaks or stand out issues – always keep your head on a swivel and be proactive in looking for any obvious problems.
- Start the oil pump prior to starting the crusher – Obviously this only works if you have a remote oil supply pump. There are still a few countershafts driven oil pump machines out and about – if that applies to you, please read and consider the retrofit to a remote system. Your crusher will thank you for it in the long run! In my old control booth, we had the oil flow / oil pressure bell alarms. I would dread starting those pumps due to the sound of those alarms. I would literally start the pumps and then immediately walk outside to get away from the noise (not advised for obvious reasons). While the alarms were sounding, I would have someone check the flow to the observation screens inside the tanks. While you will see flow – the stream may differ due to the “cold” oil and stationary crusher. This is not mandatory, but I do suggest it, just to make sure there are no issues present early in the day. You can also check the pressure gauges at this time, but the readings are mostly irrelevant due to the crusher not actively running and the oil being cold.
- If you have a water chamber machine – please inspect the oil and make sure the color is the brown / black it needs to be and that there is no “milky” look to it – if you do, then you have an issue allowing water to get into the oil system.
Start the water pump (if you are running a water chamber machine).
- Make sure there is adequate water flow and make sure the flow is consistent.
Once you’ve let the oil flow for a few minutes and the flow / pressure alarms are long gone- it’s time to fire those old beasts up!
Starting the crushers –
- Personally, I have seen both started synchronously many times, but I strongly suggest one at a time for simplicity’s sake. LISTEN during the startup – you will hear familiar sounds of the crusher “winding” up. That’s a good thing… but you should be listening for anything out of the ordinary. Metallic clicks, rattles, groans – anything atypical needs to be checked on now. This will take two people – one in the booth and one on the ground. Two sets of ears are always better than one!
- Hopefully you went under the crusher the night before and checked it… but what if you have a high amp issue and the crusher won’t start? Shut the crusher off in the booth but leave the oil system running. Lock and tag out the crusher and all associated parts, and then proceed to your checks. Start with the crushing chamber – I personally have seen rocks fall out of the chute overnight and wedge in the crusher… then when it starts to fire up that stray rock won’t allow it to. If the crushing chamber is empty, then it’s time to get serious. There are so many different things that could be the issue that I couldn’t possibly have time to checklist them all in this article… but always remember to do your checks safely!
- Unless you have head floating issues (that’s a different problem to address), let the crusher run for a few minutes before you throw rock to it. The head spin will be there, the bushings will all be lubricated, and then you can start your feed a little at a time to ramp it into full production.
Once the crusher is up to speed and crushing then it’s time to monitor the crusher. Remember these steps:
At a set time – well into the shift (I personally chose right around 3PM – this was when night shift showed up) the daily observation report needs to be completed. There is a template in the back of your Metso manual, but I recommend adding a few more details in for reference, if / when issues arise you will wish you had the added notes.
- The very first thing you should document is the date and time of initial inspection.
- Make sure to document the ambient air temperature outside.
- Next, document who takes the measurements on the ground. Different people measure differently… to eliminate as much variation as possible, think about marking the places to be checked, as well as what the measurement is called – you don’t know how many times I would ask the person taking the measurement if it was return oil temp or supply oil temp and they would say “I’m not sure it’s the one on the big pipe dumping into the screen.” Another example- you may want the oil pump body measured with a heat gun. Mark a location (spray paint dot or similar) on the location to be checked. Small things like this can help so much with consistency!
- Oil temperatures of both supply oil temps and return oil temps should be checked and documented daily. During checking we would use an infrared temperature gun along with the in system temp gauges to average the temps – we would check the coupling before the temp gauge, the gauge reading, and coupling after the temp gauge – average all three to have some consistency. Once checked, document the results in a log. This will help you keep an eye on potential issues. It’s important to be looking for a day-to-day change (this is why documenting the temps and amps every day is crucial). You are also looking for a difference between day to day that cannot be explained (IE notes in the log). If this happens, it should be further investigated immediately.
- Going hand in hand with oil temps – oil pressure should be checked and documented at this time daily as well. I have seen gauges with green zone stickers applied… and while I agree they do give you a quick reference to where the pressures and temperatures should be, I am not overly fond of them due to the “it’s in the green” comment – this is never what should be documented in the log. A numerical comment should be notated.
- It’s important for you to check and document amps while the crusher is running- unlike the jaw crushers this will need to be checked while crushing – try to maintain consistency. For example- chamber full, choke fed, or whatever the typical operating style is for your facility.
- Document the measurement of the hydraulic pressure on your clamping system as well.
- These additional comments were all things I believed were worth noting on my specific observation sheets.
- Crushing chamber level – Full / Choked fed (Yes or No) – person checking would advise this.
- Material profile – Chunky / course or fine, wet or dry
- Material supply location / Bench number – location North / south / east / or west. Now I know what you’re thinking here… the material is supplied via surge pile, surge pile blends material – yes but by 3:00 the “old” material has been cycled through and “new” material is being fed. Primary operator would advise this.
- Feeder Blend Levels – I ran a two-feeder surge tunnel so I would note feeder percentages at the time of measurements.
These are all the things I would take note of and document during crushing while the machine was operating, and they are all essential to making sure you are running in the most optimal condition.
Now the most critical talking point – postproduction day inspection!
- First things first – during production and towards the end of shift, you need to check the closed side settings of all crushers.
- This can be accomplished by a very high tech and technologically advanced method– aluminum foil Balls. We would take a decent grade of aluminum foil and roll it in a way to produce two appropriately sized foil balls (size should be comparable to the median size of feed material going into the crusher).
- Once the feed material to the crusher emptied out, we would then drop the foil balls into the crushing chamber 180 degrees apart (this was done immediately after the feed material was cut off / cleared out to avoid increased head spin that could destroy the foil balls.
- The foil balls would then drop through the crusher onto a belt that should be shut down. We would then have the operator bump the belt up until the aluminum foil balls could be removed from the belt and measured.
- Most of the time we had two people dropping the foil balls and then two people retrieving them so we could complete the measurement all at one time – if not then you would have to measure the standard crusher and then repeat the steps for the short head crusher.
- Once they were dropped / retrieved, then we would have to measure the balls. We would do this with a set of Outside Diameter spring or dial mics. These foil balls would have a distinct flat spot across the face that was noticeable, and this would measure the “thickness” of the compressed materials to determine the closed side measurement.

- During the time of dropping the foil balls, the plant operator would shut the crushers down and initiate a stopwatch to measure the cost of down time. This is the amount of time it takes for the head to stop spinning and come to a stop.
- During the coast down time measurements, we would also measure the head spin / RPMs being sure to check head spin first.
The obtained measurements would again be noted in the daily observation log of the crusher. This information would be reviewed by the foreman as well as anyone else who would like to monitor the crushers. The plant foreman would make decisions pertaining to the closed side settings as to how much the crusher needed to be adjusted to help optimize production. The Plant manager would review it often just to ensure the crusher is being appropriately inspected and then adjusted to his liking.
Once the crushers were adjusted and all the inspections requiring the operator were concluded I would then go down and lock out / tag out – then try the crushers, the screens feeding them, and the discharge belts. This then left the most fun part of my working day.
- First, I would grab my handy flashlight and start at the top of the crusher (platform / hydraulic console)
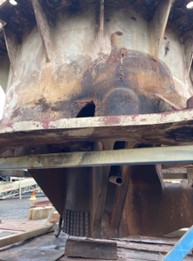
- Check the crushing chamber, making sure all large material has cleared the head.
- Inspect the mantle, bowl liner, feed plate, feed plate adapter, and any other wear surfaces that could be seen from the top of the crusher looking for damage, missing parts, and missing hardware. It’s worth it to take the extra time and inspect the feed plate hardware to ensure everything was tight and accounted for.
- On the way to the bottom side of the crusher I would check over my lube system
- Look for leaks, frayed lines, and any signs of impending issues.
- Check my return oil screen to look for foreign matter such as locking compound, backing compound, brass, or metal shavings – each of could be indicative of issues either happening now or those that could be soon to come.
- Next, I would go under the crusher.
- Start out checking base bolts, frame for cracks, and any other signs of damage on my way under the crusher.
- Look over the drive system – check v-belt guards for excessive rubber shavings / dust, check direct drive systems to show signs of grease in the coupling along with shaft walk or any possible out of the ordinary signs.
- Get under the crusher and check the bottom of the head skirt for damage/wear. I would check the bottom of the bowl liner for wear / damage.
- Check the mainframe liners for wear / damage.
- Inspect my arm guards and counterbox protection saddles for wear damage.
- Pay special attention to the oil galley of the frame looking for “wet” spots – oil and rock dust always seem to tell you about issues if you just take the time to look and see what can be seen.
- While completing these various inspections, I would also look for anything “out of the ordinary”. A good rule of thumb for crushing – if you haven’t “seen that before” there is something you need to study and find out why. Many of these machines have been around and crushing longer than I have been alive and with that – they should have a “normal” wear pattern – if something looks atypical, please do yourself a favor and investigate further. So many issues can be handled in a timely manner if they are discovered quickly enough.
Please don’t get into the habit of doing an inspection, documenting the findings, reviewing the findings, and then move on and not address any issues you have noticed through these measures. I have seen 7’ Heavy Duty Mainframes come into the shop with “windows” worn all the way through the shell – that was a very costly repair due to worn out mainframe liners. Can you imagine knowing something was amiss on such an important and expensive piece of machinery, and letting it go until it became a monumental problem? That would be a huge waste of time, money, and resources for any production.
Every crusher and every operation will be different and will have specific needs to be accounted for. I hope this article at least makes you think about your equipment and what we are doing to ensure it will continue to crush well beyond our employment. Much like that Foreman taught me – each of you are responsible for your plant just like it’s your own – as operators, supervisors, managers, and leaders we must do all we can to protect the valuable assets that keep us crushing day to day. The seasoned guys I was privileged to work with used to refer to the machines as “my crushers”. We should all take ownership and make sure our machines are well taken care of… both for the companies we work for and for the ease of operation for us all. I used to dread the under crusher inspections – it would be cold wet work and it was always hard being the man that had to reveal issues that could cause the plant guys to stay late and work weekends – but like that Foreman once told me “Bubba, you can either say something now and cause a few hours of work or you can keep quiet and watch this place fall apart – It’s your call, either way you’re going to be a hero to some and a bad guy to the others.”
Throughout my career I have acquired quite a bit of experience, and overall knowledge. I hope this has given each of you something to think about and please check us out and feel free to reach out to us for anything we may be able to help you with.
Until next time Good Luck and have fun making little ones out of big ones!
Written by: Brandon Godman
Follow us on LinkedIn, Facebook, Twitter, Instagram, and check out our Website!
Christopher Joyce Vulcan Materials of Winston-Salem, NC
Our Metso HP 800 Mainframe had a loose shaft and we re-fit the shaft back to OEM specs with a 2-week-turnaround to get a 3.5-million-ton-plant back up and running.